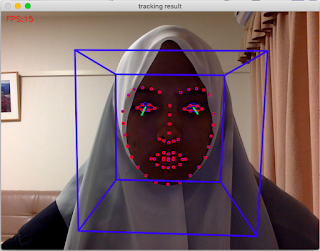
OpenFace is an open source tool intended for facial landmark detection, head pose estimation, facial action unit recognition, and eye gaze estimation.
Basically I was following the instruction here and here. I have been facing several failures in installing OpenFace 2.0. After combining the information from those two instructions, finally it works on my Mojave.
OpenFace is having very high dependencies. So, please make sure you have a good and stable internet connection. Basically, you need to have boost, dlib, OpenBLAS and OpenCV, but I might have been missing to mention some other dependencies, so, please let me know if you find me missed it. I give asterisk mark (*) to note the mandatory step. There are 9 steps, 8 steps are prerequisites, step 8 is building, step 9 is testing.
Prerequisites
1*. Download the OpenFace Project from this repo
https://github.com/TadasBaltrusaitis/OpenFace2. The landmark detection model is not included in the direcotry you download in step 1. But you can download it using bash download_models.sh
./download_models.sh
3. If you do not have Homebrew on your MacOS, I will recommend you to install it
4. I also install XQuartz , an X Window system for OS X. It's not a mandatory but they said having X libraries and include files on your system will make OpenFace much easier to build. Anyway, I just follow them, hahah. So, I then was fully using XQuartz instead of Mac's terminal. I guess it will be the same if you just use the terminal.
5*. Install boost, TBB, dlib, OpenBLAS and OpenCV. I was installing them one by one, but you also just do it in one go. It will install the latest version.
brew update brew install tbb brew install openblas brew install dlib brew install opencv brew install boost6*. In the OpenFace directory (the one you have downloaded in step 1), open CMakeLists.txt and add:
find_package( OpenCV HINTS usr/local/Cellar/opencv/4.1.0_2/)and comment the original line for find_package openCV
#find_package( OpenCV 3.3 REQUIRED COMPONENTS core imgproc calib3d highgui objdetect)The path usr/local/Cellar/opencv/4.1.0_2/ is where brew installed my openCV package. So, check on your machine and make sure you have the correct path.
7*. Add the following lines to CMakeLists.txt e.g. after the similar section for Boost:
find_package( X11 REQUIRED )
MESSAGE("X11 information:")
MESSAGE(" X11_INCLUDE_DIR: ${X11_INCLUDE_DIR}")
MESSAGE(" X11_LIBRARIES: ${X11_LIBRARIES}")
MESSAGE(" X11_LIBRARY_DIRS: ${X11_LIBRARY_DIRS}")
include_directories( ${X11_INCLUDE_DIR} )
Building
8. In OpenFace directory, execute the following:
mkdir build
cd build
cmake -D CMAKE_BUILD_TYPE=RELEASE CMAKE_CXX_FLAGS="-std=c++11" -D CMAKE_EXE_LINKER_FLAGS="-std=c++11" ..
make
Testing
9. If you build successfully, you should have binaries in the bin directory inside build directory. To test it, go to bin directory and run:
./FaceLandmarkVid -device 0and here is the result

Good Luck!!

No comments:
Post a Comment